Chicken Nachos
There’s something incredibly satisfying about sharing a platter of Chicken Nachos with friends and family, especially during game night or a cozy movie marathon. I remember the last time we made them; it was a spontaneous Friday evening, and I had a bag of corn tortillas calling my name. In just minutes, I transformed those humble tortillas and some leftover chicken into a mouthwatering dish that had everyone asking for seconds. The vibrant colors of the toppings and the bubbling cheese made it impossible to resist. Each bite was a perfect blend of crispy, cheesy, and savory flavors that brought back fond memories. Whether it’s a casual hangout or a festive gathering, Chicken Nachos always steals the show and creates an atmosphere of happiness and togetherness. Let me share with you how this deliciousness comes together!
Recipe Snapshot
40 mins
10 mins
30 mins
Medium
450 kcal
30 g
Gluten-Free, Low FODMAP
20 g
Blender, Wooden Spoon, Mixing Bowl, Oven, Cutting Board, Frying Pan, Chef’s Knife, Saucepan, Baking Sheet
The Beauty of This Chicken Nachos
Comforting and Satisfying
What I love most about Chicken Nachos is how comforting they are. The combination of crispy tortillas, tender chicken, and melty cheese is unbeatable. It’s a dish that warms the heart and soul, and it’s perfect for any occasion!
Customizable
Another reason to adore this recipe is its versatility. You can top your nachos with anything you desire—fresh veggies, different types of cheeses, or even beans. The options are endless, allowing everyone to make their plate just the way they like it.
Perfect for Sharing
There’s something special about gathering around a big platter of Chicken Nachos. It encourages sharing and creates a lively atmosphere. Whether it’s for game day, a party, or a family dinner, nachos are always a highlight.
Easy to Prepare
Don’t be fooled by the gourmet look of this dish. Chicken Nachos are surprisingly easy to make! With just a few simple ingredients and steps, you can whip up this crowd-pleaser in no time.
Fun for Everyone
Kids love nachos, and adults can’t resist them either! This is a dish that appeals to all ages, making it perfect for family get-togethers. It’s fun to assemble and even more enjoyable to eat!
Great for Leftovers
One of my favorite aspects is that they are great as leftovers. If you happen to have any nachos left (a rare occurrence), you can easily reheat them for a satisfying next-day snack!
What You Need for Chicken Nachos
Creating Chicken Nachos is all about using fresh, quality ingredients that complement each other beautifully. The core components include tender chicken, flavorful salsa, and crispy tortillas, while optional toppings like cheese and fresh veggies add a personal touch. It’s this harmony of textures and flavors that makes this dish a favorite.
- 1 ¼ pounds boneless, skinless chicken thighs or breasts: These are the star of the dish, providing protein and richness. You can use thighs for added flavor or breasts for a leaner option.
- 1 (16-ounce) jar prepared salsa: Choose your preferred heat level—mild, medium, or spicy. This ingredient brings a burst of flavor and moisture to the nachos.
- 1 tablespoon ground cumin: This warm spice adds depth and an earthy flavor that enhances the overall taste.
- ½ to 1 teaspoon ground chipotle chili pepper: Depending on your heat preference, this spice will give your nachos a nice kick.
- 1 teaspoon dried oregano: A fragrant herb that contributes to the overall flavor profile.
- 1 teaspoon garlic powder: Essential for adding a savory note that everyone loves.
- 1 teaspoon kosher salt: Enhances all the flavors in the dish.
- ¼ cup water: Helps to create a sauce with the chicken and salsa.
- 1 (14.5-ounce) can low sodium pinto beans: Rinsed and drained, these beans add fiber and texture.
- 8 yellow corn tortillas: The base for your nachos; they’ll become crispy and golden.
- Cooking spray: For baking the tortillas to achieve that perfect crunch.
- ½ teaspoon kosher salt: Additional seasoning for the chips.
- 6 ounces Mexican blend cheese: A melty, gooey topping that elevates the nachos.
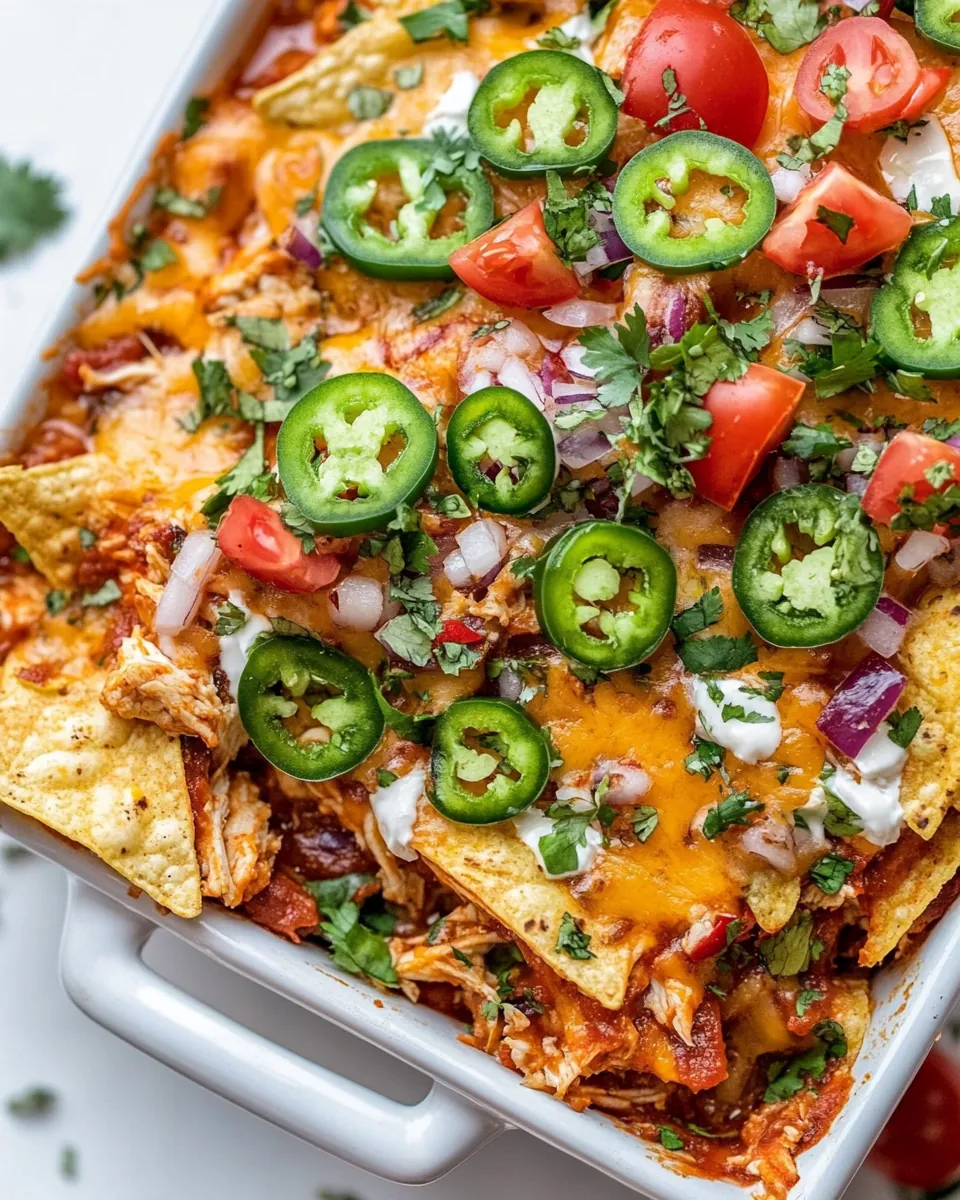
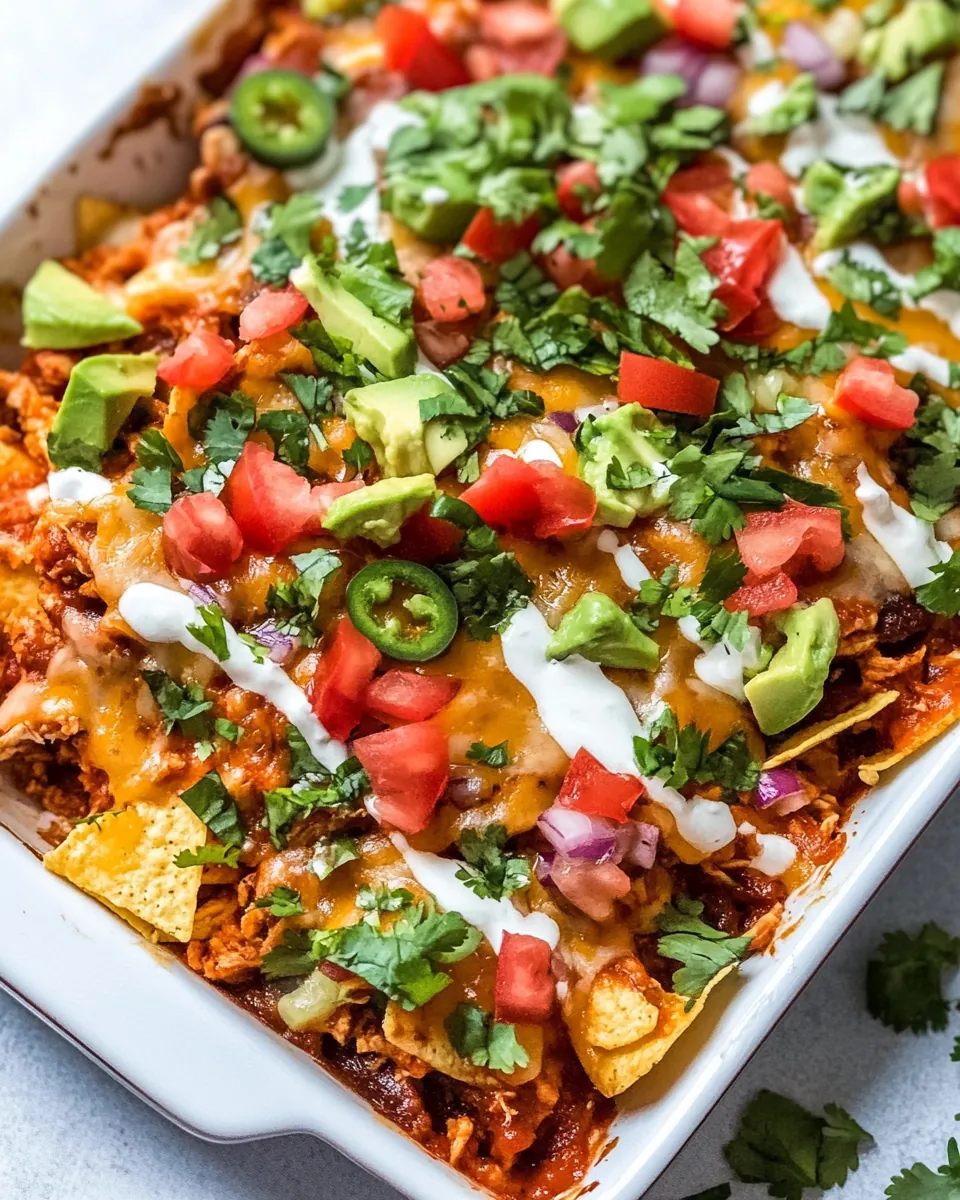
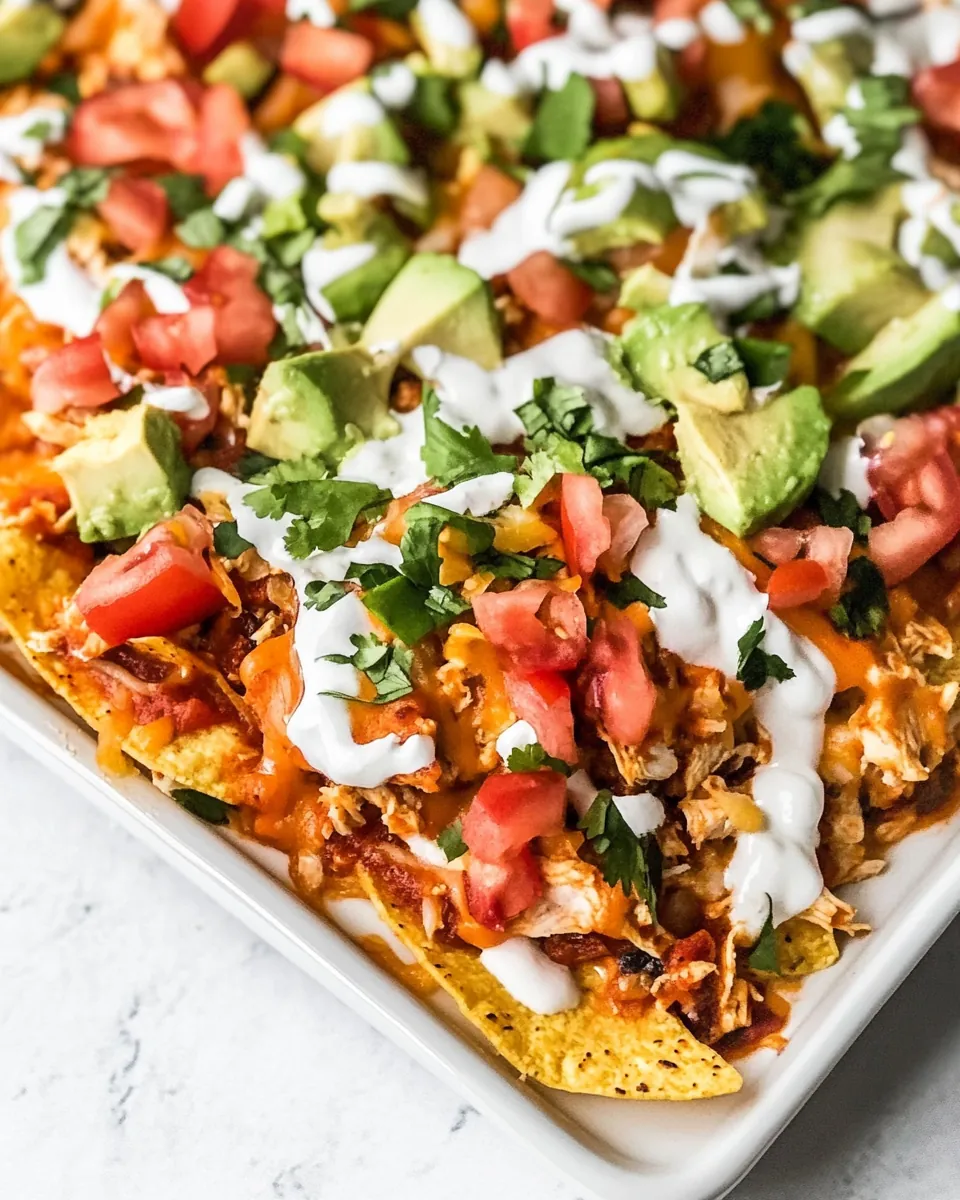
- Other desired nacho fixin’s: Chopped green onions, sliced black olives, sliced jalapenos, cilantro, diced avocados, diced fresh tomatoes, nonfat plain Greek yogurt, or sour cream for extra flair.
Step by Step Guide for Chicken Nachos
Making Chicken Nachos is a fun and engaging process! Follow along as we break it down into simple steps that guide you through creating this crowd-pleaser. Get ready to enjoy a fantastic meal that’s sure to impress!
Start by placing the chicken, salsa, cumin, chipotle chili, oregano, garlic powder, salt, and water in a medium saucepan. Stir to combine the ingredients, ensuring that the chicken is coated well.
Bring the mixture to a gentle simmer over medium heat. You’ll know it’s ready when you see small bubbles rising to the surface. It’s crucial to keep an eye on it to avoid burning.
Partially cover the pot and simmer for 12 to 14 minutes, or until the chicken reaches an internal temperature of 165°F. Halfway through, use a large spoon to turn the chicken over, allowing the salsa mixture to coat it.
Once the chicken is cooked, transfer it to a cutting board. Using two forks, shred the chicken into bite-sized pieces. You can also do this directly in the pot for convenience.
Return the shredded chicken to the saucepan and stir in the rinsed and drained pinto beans. Let this simmer for an additional 2 minutes, stirring often until hot and slightly thickened.
While the chicken and beans are simmering, preheat your oven to 350°F. Cut the corn tortillas into 6 wedges. I like to cut each tortilla in half and then slice each half into three equal wedges for even baking.
Arrange the tortilla wedges in a single layer on two ungreased baking sheets. Bake for 6 minutes. After that, using tongs, flip the chips and lightly coat them with cooking spray. Sprinkle with kosher salt.
Rotate the pans between the top and bottom racks, then continue baking for an additional 6 to 9 minutes until they begin to turn golden brown. Remove them from the oven and let them cool.
Now, turn your oven to broil. Arrange the cooled tortilla chips on an oven-proof serving platter or pile them onto a baking sheet.
Spoon the chicken and bean mixture over the chips, then sprinkle with cheese. Broil for a few minutes until the cheese is melted and bubbly, keeping a close watch to prevent burning.
Remove from the oven and sprinkle with any additional toppings you desire, such as chopped green onions, sliced olives, or diced avocados.
Finally, dig in and enjoy your homemade Chicken Nachos immediately for the best experience!
Things Worth Knowing
- Resting time: Allow the nachos to cool slightly before serving. This helps the cheese set a bit, making it easier to enjoy without everything sliding off.
- Chip texture: Ensure the tortilla chips are baked until crunchy. This base is essential for holding all the delightful toppings.
- Layering: For best results, layer toppings evenly across the nachos. Start with chips, followed by the chicken mixture, and finally the cheese to ensure everything melts evenly.
- Fresh toppings: Add fresh ingredients like cilantro or jalapenos just before serving for a burst of flavor and color.
Pro Tips and Tweaks

To elevate your Chicken Nachos, I’ve gathered some helpful tips and tweaks that could enhance your experience. Whether you want to try something new or ensure perfection, these suggestions will assist you!
- Storage: Refrigerate leftover nachos in an airtight storage container for up to 2 days. Keep toppings separate from the tortilla chips for best results.
- Freezing: You can freeze the chicken mixture in an airtight freezer-safe container for up to 3 months. Thaw overnight in the refrigerator before reheating.
- Reheating: Rewarm nachos on a baking sheet in the oven at 350°F to maintain crispness, or use a microwave if you’re in a hurry.
- Pairing: Serve Chicken Nachos with a refreshing side salad or guacamole for a balanced meal.
- Variations: Experiment with different cheeses, such as pepper jack for a spicy kick or traditional cheddar for a milder flavor.
- Make it vegetarian: Substitute the chicken with grilled vegetables or black beans for a delicious vegetarian option.
- Spice it up: If you like extra heat, use spicy salsa or add some chopped fresh jalapenos on top before serving.
How to Serve Chicken Nachos
Serving Chicken Nachos is truly a joy, as it invites everyone to gather around and enjoy a communal dish. Here are some fantastic ideas on how to serve them:
- Game Night: Chicken Nachos are a must-have for game day or movie nights. Gather your friends, set them up on a coffee table, and let the fun begin!
- Family Gatherings: Perfect for family dinners, this dish will please both adults and children alike. Set up a toppings bar for added fun where everyone can customize their nachos.
- Casual Parties: Whether it’s a birthday bash or a casual get-together, Chicken Nachos fit right in and make serving easy and enjoyable.
- Seasonal Events: For summer barbecues or winter gatherings, nachos are a versatile dish that can adapt to any season with the right toppings.
- Leftover Lunch: Serve leftover nachos for lunch the next day; just reheat and enjoy the deliciousness all over again!
- Side Dish: Use Chicken Nachos as a side to grilled meats or tacos, making them a versatile addition to any meal.
- Festive Occasions: Add a festive flair by incorporating seasonal toppings, like roasted pumpkin during fall!
FAQ
Conclusion
This Chicken Nachos recipe is special because it’s not only delicious but also incredibly easy to make. The combination of crispy tortillas, savory chicken, and melted cheese creates a dish that’s perfect for sharing and enjoying with loved ones. I encourage you to try it at home and make it your own with your favorite toppings. Trust me; once you experience the joy of making and eating these nachos, they’ll quickly become a favorite in your kitchen.
Chicken Nachos
Ingredients
Equipment
Method
- Start by placing the chicken, salsa, cumin, chipotle chili, oregano, garlic powder, salt, and water in a medium saucepan. Stir to combine the ingredients, ensuring that the chicken is coated well.
- Bring the mixture to a gentle simmer over medium heat. You'll know it’s ready when you see small bubbles rising to the surface. It's crucial to keep an eye on it to avoid burning.
- Partially cover the pot and simmer for 12 to 14 minutes, or until the chicken reaches an internal temperature of 165°F. Halfway through, use a large spoon to turn the chicken over, allowing the salsa mixture to coat it.
- Once the chicken is cooked, transfer it to a cutting board. Using two forks, shred the chicken into bite-sized pieces. You can also do this directly in the pot for convenience.
- Return the shredded chicken to the saucepan and stir in the rinsed and drained pinto beans. Let this simmer for an additional 2 minutes, stirring often until hot and slightly thickened.
- While the chicken and beans are simmering, preheat your oven to 350°F. Cut the corn tortillas into 6 wedges. I like to cut each tortilla in half and then slice each half into three equal wedges for even baking.
- Arrange the tortilla wedges in a single layer on two ungreased baking sheets. Bake for 6 minutes. After that, using tongs, flip the chips and lightly coat them with cooking spray. Sprinkle with kosher salt.
- Rotate the pans between the top and bottom racks, then continue baking for an additional 6 to 9 minutes until they begin to turn golden brown. Remove them from the oven and let them cool.
- Now, turn your oven to broil. Arrange the cooled tortilla chips on an oven-proof serving platter or pile them onto a baking sheet.
- Spoon the chicken and bean mixture over the chips, then sprinkle with cheese. Broil for a few minutes until the cheese is melted and bubbly, keeping a close watch to prevent burning.
- Remove from the oven and sprinkle with any additional toppings you desire, such as chopped green onions, sliced olives, or diced avocados.
- Finally, dig in and enjoy your homemade Chicken Nachos immediately for the best experience!
Notes
- Storage: Refrigerate leftover nachos in an airtight storage container for up to 2 days. Keep toppings separate from the tortilla chips for best results.
- Freezing: You can freeze the chicken mixture in an airtight freezer-safe container for up to 3 months. Thaw overnight in the refrigerator before reheating.
- Reheating: Rewarm nachos on a baking sheet in the oven at 350°F to maintain crispness, or use a microwave if you're in a hurry.
- Pairing: Serve Chicken Nachos with a refreshing side salad or guacamole for a balanced meal.
- Variations: Experiment with different cheeses, such as pepper jack for a spicy kick or traditional cheddar for a milder flavor.
- Make it vegetarian: Substitute the chicken with grilled vegetables or black beans for a delicious vegetarian option.
- Spice it up: If you like extra heat, use spicy salsa or add some chopped fresh jalapenos on top before serving.