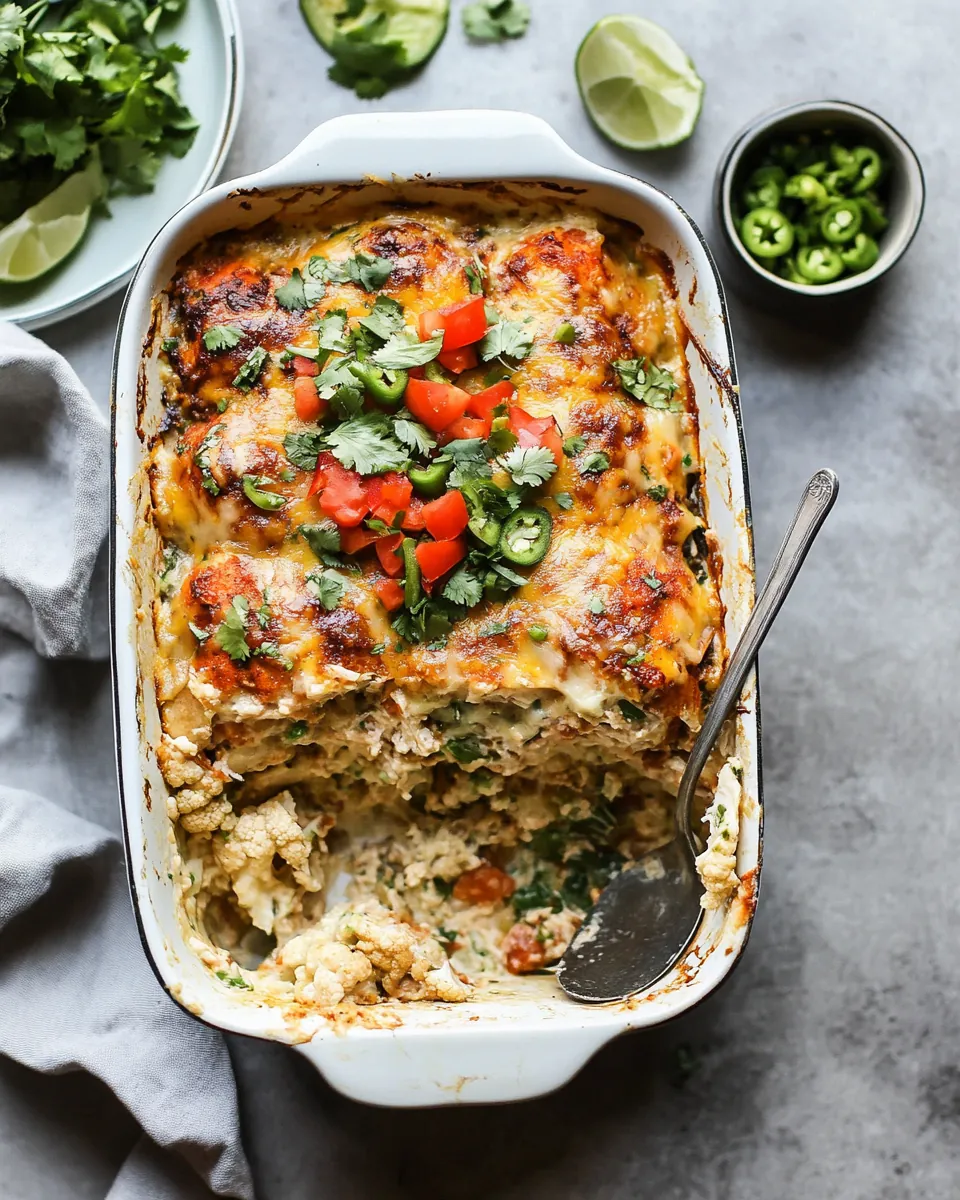
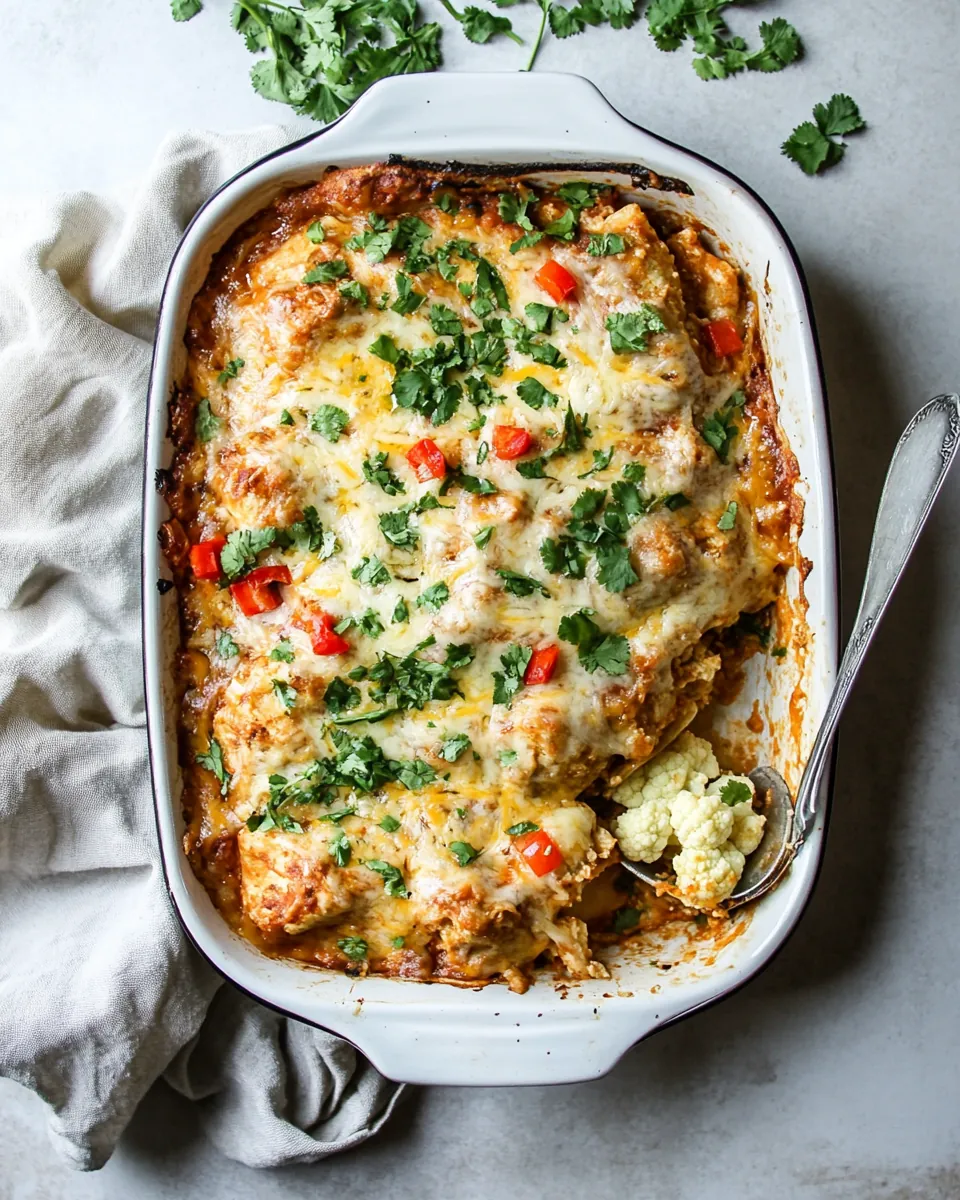
Chicken Enchilada Casserole
When I first tried making a Chicken Enchilada Casserole, I was on the hunt for a comforting dish that combined all the flavors I loved about enchiladas, but with a twist. The idea of layering everything into a casserole appealed to my desire for simplicity and ease. Picture a cozy evening with friends, the aroma of seasoned chicken filling the air, and a bubbling casserole ready to be enjoyed. That’s the magic of this dish! It’s a great way to bring everyone together around the table, especially on a busy weeknight when you want a delicious meal without too much fuss.
Recipe Snapshot
2 hr 10 mins
30 mins
100 mins
Hard
340 kcal
28g g
Keto, Gluten-Free, Low FODMAP
20g g
Blender, Wooden Spoon, Mixing Bowl, Oven, Cutting Board, Food Processor, Large Pot, Frying Pan, Chef’s Knife, Saucepan, Baking Sheet
The Magic of This Chicken Enchilada Casserole
Healthier Alternative
One of the things I love most about this Chicken Enchilada Casserole is how it’s a healthier take on a classic dish. By using cauliflower instead of traditional tortillas, we not only reduce carbs but also add extra nutrients to the meal. The result is every bit as satisfying, but without the heaviness.
Flavor Packed
This recipe is loaded with flavor, thanks to ingredients like taco seasoning and enchilada sauce. Each bite bursts with the savory goodness of chicken and spices that dance on the palate. Who knew a casserole could taste this good?
Easy to Make
Don’t worry if you’re not a kitchen whiz; this Chicken Enchilada Casserole is straightforward to prepare. With clear steps and minimal fuss, you’ll find yourself whipping it up in no time. Plus, it’s a great dish to make ahead of time!
Perfect for Meal Prep
Speaking of making ahead, this casserole is perfect for meal prep! You can easily double the recipe and freeze one for a busy week ahead. Just pop it in the oven when you’re ready to feast, and you’ll have a hearty meal awaiting you!
Customizable
Another highlight of this dish is its versatility. You can customize it based on your taste or dietary preferences. Want more heat? Toss in some jalapeños. Prefer a creamier texture? Add a dollop of sour cream. The possibilities are endless!
What You’ll Need for Chicken Enchilada Casserole
Gathering the right ingredients is essential for a successful dish, and with this Chicken Enchilada Casserole, you’ll be working with a delightful mix. Each ingredient plays a crucial role in creating a harmonious blend of flavors. The key players are the chicken, which provides protein, and cauliflower, which serves as a healthy base. Together with cheese, enchilada sauce, and spices, you’ll create a masterpiece that’s both nutritious and satisfying.
- 8 ounces chicken breast – This lean protein is the star of the dish, providing substance and flavor.
- 1.5 pounds cauliflower florets – Used as a healthier alternative to tortillas, this veggie adds volume and nutrients.
- 1 tablespoon extra-virgin olive oil – A healthy fat that enhances flavor and helps cook the ingredients.
- 1 tablespoon garlic (minced) – Adds aromatic depth and enhances the overall flavor of the casserole.
- 1 large onion (roughly chopped) – Provides sweetness and complements the savory elements.
- 1 tablespoon taco seasoning – Brings that traditional Mexican flavor profile to the dish.
- 1 10-ounce can red enchilada sauce – A key ingredient that ties all the flavors together.
- 1 large egg – Helps bind the ingredients for a firmer casserole texture.
- 1 egg white – Adds structure without adding extra fat.
- ½ teaspoon salt – Enhances the flavors of the dish.
- Black pepper (to taste) – A staple seasoning that adds a mild heat.
- 1 4-ounce can canned green chilis – Adds a touch of spice and flavor complexity.
- 1 cup reduced-fat Mexican cheese blend – Melts beautifully on top, adding creaminess.
- Cilantro – Fresh herbal garnish that brightens the dish.
- Tomatoes (diced) – A fresh topping that adds color and flavor.
- Avocado (sliced) – Provides a creamy texture that contrasts with the casserole.
Cooking Method for Chicken Enchilada Casserole
Cooking this Chicken Enchilada Casserole is an enjoyable process that fills your kitchen with mouthwatering scents. Follow the steps closely, and you’ll witness how simple ingredients come together to create a comforting dish. Let’s get started!
- Preheat your oven to 400℉, and rub an 8×8-inch or 9×9-inch casserole dish with olive oil. This step is essential to prevent sticking and to add flavor to the dish.
- Fill a medium pot and a large pot with water. Add a pinch of salt to each, and bring to a boil. Once boiling, reduce each pot’s heat to medium. Place the chicken in the medium pot and the cauliflower florets in the large pot. Cover just the cauliflower pot with a lid. Cook until the chicken is no longer pink and the cauliflower is fork-tender, about 10 to 15 minutes.
- Once the chicken is cooked, transfer it to a plate to cool. Drain the cauliflower and place it onto a kitchen towel to drain and cool for 10 minutes, or until cool enough to handle. This step is crucial to remove excess water so your casserole doesn’t become soggy.
- While the cauliflower and chicken cook, heat the olive oil in a large, high-sided pan on medium heat. Add in the garlic, onion, and taco seasoning, and cook until lightly golden brown, stirring frequently. This should take about 3 to 5 minutes. You’ll know it’s ready when the onion becomes translucent, and the mixture smells amazing.
- Add the can of enchilada sauce and bring to a boil. Cook for 1 minute at full boil. Reduce the heat down to medium and simmer until the sauce is reduced and thick, about 7 minutes. Keep an eye on it, stirring occasionally to prevent sticking.
- Once the cauliflower is cool enough to handle, wrap it up in a kitchen towel and wring out as much of the water as possible. Do this twice, using a new towel each time. This is important to ensure the casserole holds its shape and flavor.
- Place the cauliflower into a large food processor, along with the egg, egg white, salt, and a generous pinch of pepper. Add the enchilada sauce mixture and process until the mixture is smooth. Transfer to a large bowl. The texture should be creamy and well combined.
- Shred the cooked chicken and add it into the bowl along with the green chilis, stirring until well mixed. Be careful not to overmix; we want to keep some texture in the casserole.
- Transfer the mixture to the prepared casserole dish and cover with foil. Bake for 30 minutes, then remove the foil and cook for another 30 to 40 minutes, or until the casserole feels set and the sides are lightly browned. You’ll want to check for a firm texture before taking it out.
- Sprinkle with cheese and cook an additional 2 to 3 minutes, until the cheese is melted. This step adds that delightful cheesy goodness that everyone loves.
- Once out of the oven, cover the casserole with foil to keep it warm, and let it sit for 10 minutes, so it absorbs some of the excess moisture. Then, slice and serve. It’s essential to let it rest; this helps the flavors meld together.
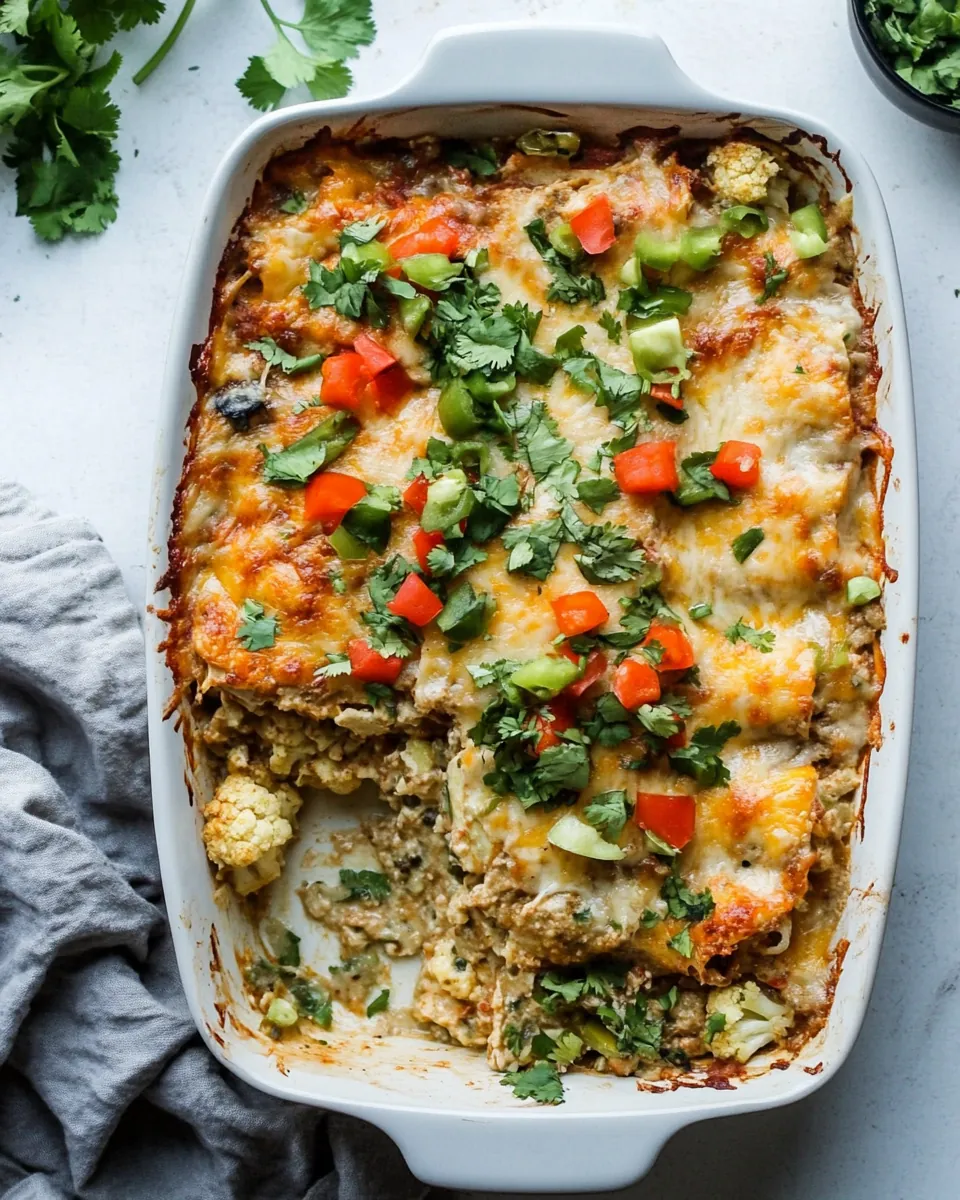
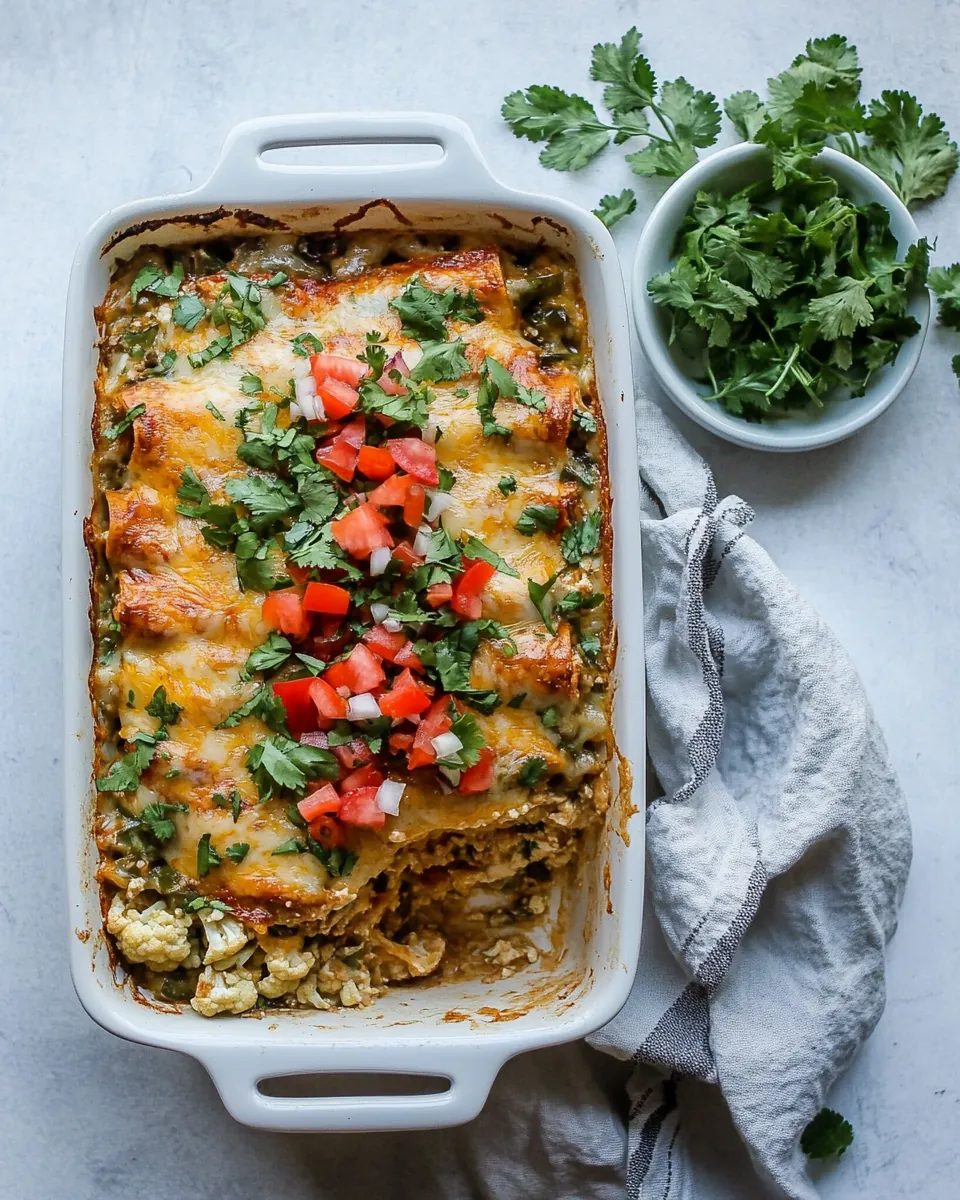
- Sprinkle with cilantro, tomatoes, and avocado to garnish. Serve hot and enjoy the delicious flavors!
Things Worth Knowing
- Cooking the Cauliflower: Ensure the cauliflower is fork-tender. This will help it blend smoothly into the mixture.
- Shredding Chicken: Use two forks to shred the chicken easily while it’s still warm.
- Preventing Sogginess: Make sure to drain the cauliflower thoroughly to avoid a watery casserole.
- Adjusting Spice Levels: Feel free to add more taco seasoning or fresh peppers for an extra kick.
How to Switch It Up
If you’re looking to put a unique spin on the Chicken Enchilada Casserole, you’re in luck! There are countless variations that can make this dish even more exciting. Here are some tips to get you started:
- Storage: Allow leftovers to cool completely before storing them in an airtight container. They will keep well in the fridge for up to 3 days.
- Freezing: You can freeze the unbaked casserole for up to 2 months. Just thaw it in the fridge overnight before baking.
- Pairing: Serve with a side of fresh salad or corn on the cob for a complete meal.
- Vegetarian Option: Swap the chicken for beans or lentils to create a vegetarian-friendly version.
- Cheese Choices: Experiment with different cheese blends like pepper jack for a spicy twist.
- Garnishing: Add a dollop of Greek yogurt instead of sour cream for a healthier topping.
- Seasonal Add-ins: Incorporate seasonal vegetables like zucchini or bell peppers to add color and nutrition.
What Goes Well With This Chicken Enchilada Casserole
When it comes to serving your Chicken Enchilada Casserole, there are plenty of delicious options to complement this dish. Here are some ideas to round out your meal:
- Fresh Green Salad: A simple green salad with a tangy vinaigrette balances the richness of the casserole.
- Mexican Rice: Serve alongside fluffy Mexican rice to soak up the flavorful sauce.
- Cornbread: A slice of cornbread makes for a delightful, hearty pairing.
- Sour Cream: A dollop of sour cream adds creaminess when serving for those who like a richer taste.
- Guacamole: Fresh guacamole on the side is perfect for an extra layer of flavor.
- Chips: Serve with tortilla chips for a satisfying crunch that contrasts with the casserole.
- Occasions: This dish is perfect for family dinners, potlucks, or even game-day gatherings. It’s a crowd-pleaser!
FAQ
Conclusion
The Chicken Enchilada Casserole is an incredible dish that perfectly balances healthy ingredients with rich, comforting flavors. It’s not just a meal; it’s an experience that brings warmth to your kitchen and joy to your table. I encourage you to give this recipe a try and enjoy the delightful blend of spices and textures. You won’t be disappointed!
Chicken Enchilada Casserole
Ingredients
Equipment
Method
- Preheat your oven to 400℉, and rub an 8×8-inch or 9×9-inch casserole dish with olive oil. This step is essential to prevent sticking and to add flavor to the dish.
- Fill a medium pot and a large pot with water. Add a pinch of salt to each, and bring to a boil. Once boiling, reduce each pot's heat to medium. Place the chicken in the medium pot and the cauliflower florets in the large pot. Cover just the cauliflower pot with a lid. Cook until the chicken is no longer pink and the cauliflower is fork-tender, about 10 to 15 minutes.
- Once the chicken is cooked, transfer it to a plate to cool. Drain the cauliflower and place it onto a kitchen towel to drain and cool for 10 minutes, or until cool enough to handle. This step is crucial to remove excess water so your casserole doesn’t become soggy.
- While the cauliflower and chicken cook, heat the olive oil in a large, high-sided pan on medium heat. Add in the garlic, onion, and taco seasoning, and cook until lightly golden brown, stirring frequently. This should take about 3 to 5 minutes. You’ll know it’s ready when the onion becomes translucent, and the mixture smells amazing.
- Add the can of enchilada sauce and bring to a boil. Cook for 1 minute at full boil. Reduce the heat down to medium and simmer until the sauce is reduced and thick, about 7 minutes. Keep an eye on it, stirring occasionally to prevent sticking.
- Once the cauliflower is cool enough to handle, wrap it up in a kitchen towel and wring out as much of the water as possible. Do this twice, using a new towel each time. This is important to ensure the casserole holds its shape and flavor.
- Place the cauliflower into a large food processor, along with the egg, egg white, salt, and a generous pinch of pepper. Add the enchilada sauce mixture and process until the mixture is smooth. Transfer to a large bowl. The texture should be creamy and well combined.
- Shred the cooked chicken and add it into the bowl along with the green chilis, stirring until well mixed. Be careful not to overmix; we want to keep some texture in the casserole.
- Transfer the mixture to the prepared casserole dish and cover with foil. Bake for 30 minutes, then remove the foil and cook for another 30 to 40 minutes, or until the casserole feels set and the sides are lightly browned. You’ll want to check for a firm texture before taking it out.
- Sprinkle with cheese and cook an additional 2 to 3 minutes, until the cheese is melted. This step adds that delightful cheesy goodness that everyone loves.
- Once out of the oven, cover the casserole with foil to keep it warm, and let it sit for 10 minutes, so it absorbs some of the excess moisture. Then, slice and serve. It’s essential to let it rest; this helps the flavors meld together.
- Sprinkle with cilantro, tomatoes, and avocado to garnish. Serve hot and enjoy the delicious flavors!
Notes
- Tip 1: Allow leftovers to cool completely before storing them in an airtight container. They will keep well in the fridge for up to 3 days.
- Tip 2: You can freeze the unbaked casserole for up to 2 months. Just thaw it in the fridge overnight before baking.
- Tip 3: Serve with a side of fresh salad or corn on the cob for a complete meal.
- Tip 4: Swap the chicken for beans or lentils to create a vegetarian-friendly version.
- Tip 5: Experiment with different cheese blends like pepper jack for a spicy twist.