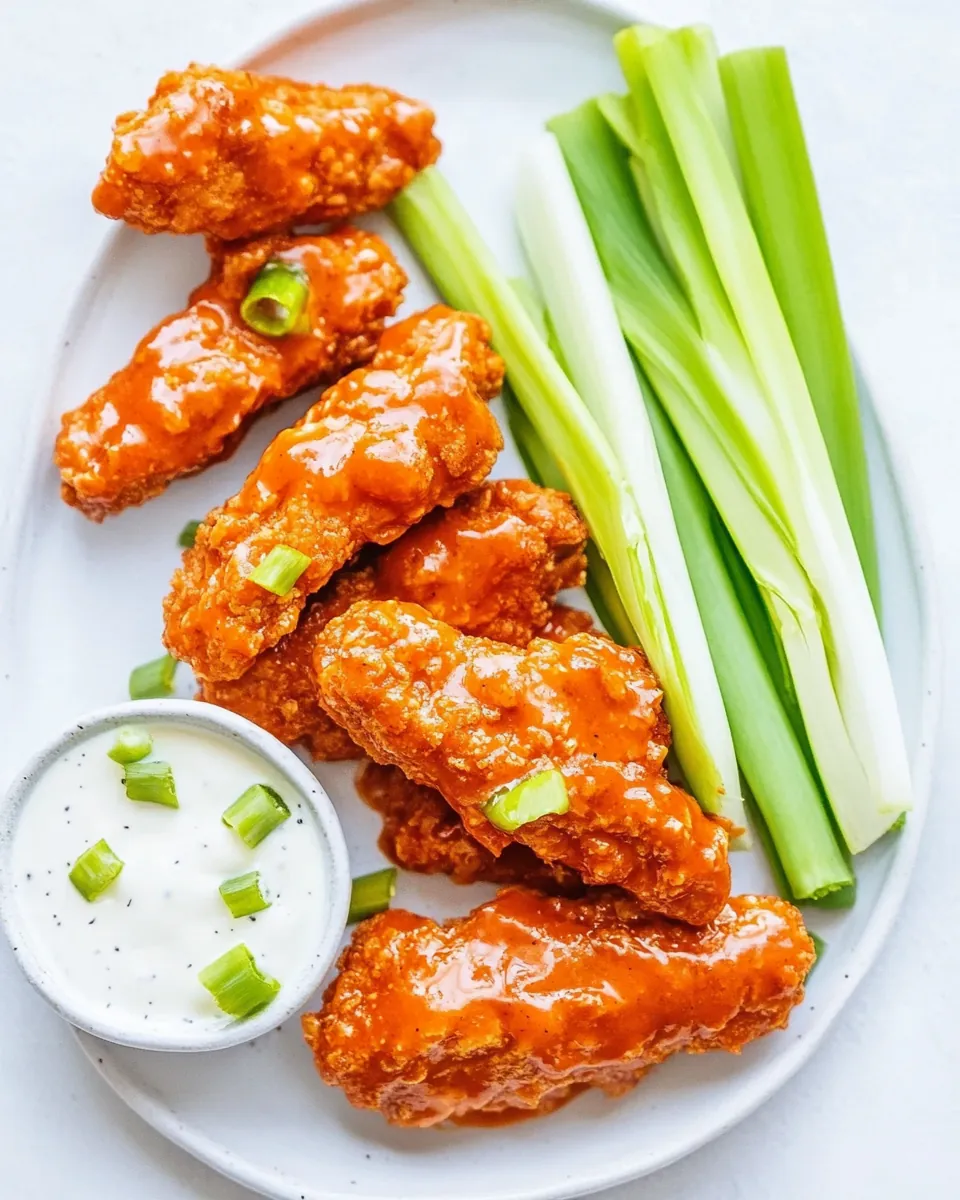
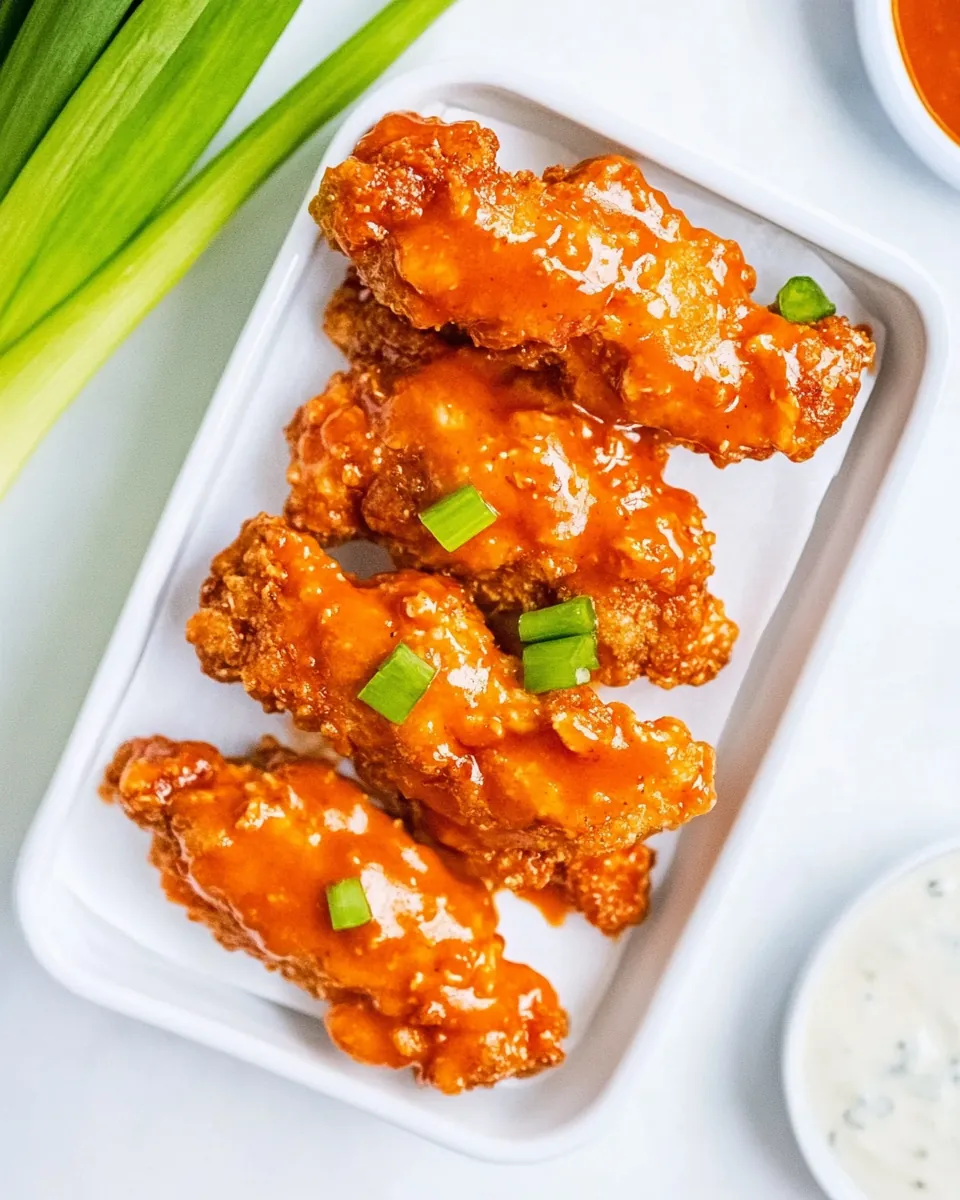
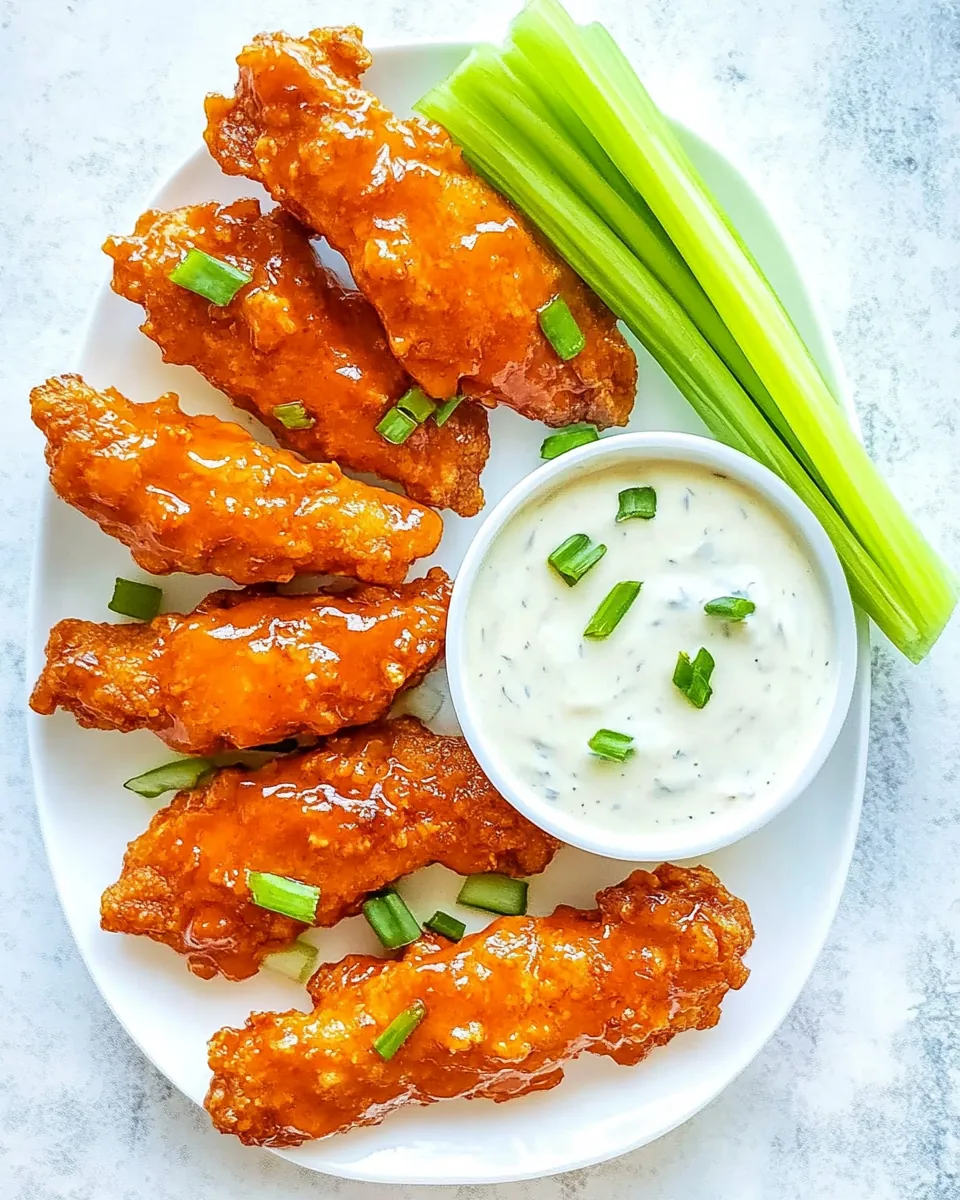
Buffalo Chicken Tenders
There’s something undeniably comforting about the crispy, spicy goodness of Buffalo Chicken Tenders. Whenever I find myself craving a snack that’s both satisfying and bursting with flavor, these tenders are my go-to choice. Picture a busy weeknight when the family is gathering around the table, and the aroma of freshly baked chicken fills the air. As I pull the tray from the oven, the golden-brown tenders glisten, coated in a tantalizing hot sauce that promises to deliver just the right kick. It’s this combination of crunch and heat that makes Buffalo Chicken Tenders not just any dish; they’re a family favorite that sparks joy and togetherness at dinner time.
These tenders are perfect for a casual family dinner, game day snacks, or even a cozy movie night. I remember the first time I served them at a gathering; they disappeared within minutes! The best part? You can easily adjust the spice level to your liking. Whether you prefer them mild or fiery hot, this recipe allows you to customize the heat to suit your taste buds. Plus, they pair wonderfully with crunchy veggies and your favorite dipping sauces, making every bite a delightful experience.
Recipe Snapshot
45 mins
25 mins
20 mins
Medium
350 kcal
30 g
Gluten-Free, Low FODMAP
15 g
Large sheet pan (15″ x 21″), Cooling rack, Frying pan
Why This Buffalo Chicken Tenders Shines
Why They’re Irresistible
Let me tell you why Buffalo Chicken Tenders are so special. First off, the crispy coating made from panko breadcrumbs creates an incredible texture that you just can’t replicate with regular breadcrumbs. Each bite is a satisfying crunch that gives way to tender, juicy chicken. Secondly, the hot sauce adds a flavor punch that can be tailored to your taste, whether you like it mild or extra spicy. You get to control your heat level!
Perfect for Any Occasion
These tenders are not just a meal; they’re an experience. Whether it’s a weeknight dinner, a party, or just a cozy night at home, they bring a fun and casual vibe to the table. Everyone loves finger foods, and these are no exception. I often serve them at gatherings, and watching friends and family dive into the dish makes cooking them so rewarding.
Easy to Make
If you think making homemade tenders is challenging, think again! This recipe is straightforward and perfect for cooks of all levels. With just a handful of ingredients and simple steps, you’ll have restaurant-quality tenders that impress. Plus, they bake in the oven, which means less mess and more time to enjoy with loved ones.
Meal Prep Friendly
Another reason to love Buffalo Chicken Tenders is their meal prep potential. You can prepare them ahead of time, bread them, and store them in the fridge until you’re ready to bake. This makes them an excellent option for busy weekdays or unexpected guests. Just pop them in the oven, and you’ve got a delicious meal in no time!
Versatile Pairings
Finally, the versatility of these tenders is unmatched. They pair beautifully with a crisp salad, creamy ranch, or even a side of sweet potato fries. You can also toss them in a variety of sauces, from traditional buffalo to a tangy barbecue. The combinations are endless, making it easy to keep things exciting!
What You Need for Buffalo Chicken Tenders
The ingredients for these tenders are simple yet effective, working harmoniously to create a dish that’s crispy, spicy, and utterly delicious. The key players here are chicken, which forms the tender base, and panko breadcrumbs, which provide that satisfying crunch. Together with the right spices and sauces, these elements come together perfectly for a meal that’s sure to impress.
- 1 pound chicken tenders (tendons removed): This lean protein is the heart of the dish, ensuring a juicy and satisfying bite.
- 1-1/2 cups panko breadcrumbs: These breadcrumbs are lighter and crunchier than standard ones, resulting in a superior coating.
- 2 tablespoons unsalted butter: Melted butter adds richness and helps the breadcrumbs brown beautifully.
- Cooking spray: Essential for ensuring a crispy texture without excess fat.
- 1 large egg: Acts as a binder, helping the breadcrumbs stick to the chicken.
- 3 tablespoons mayo: Adds moisture and flavor to the batter.
- 2 tablespoons flour: Creates a light coating for the tenders before breading.
- 1 teaspoon paprika: Provides a subtle smokiness and enhances the color.
- 1 (1-ounce) packet ranch seasoning mix: A flavor powerhouse that elevates the tenders.
- 4 tablespoons unsalted butter (melted): For tossing the tenders after baking to add more flavor.
- 1/2 cup hot sauce (such as Frank’s): The star ingredient, giving these tenders their classic buffalo flavor.
- 1 to 2 tablespoons light brown sugar: Balances out the heat of the hot sauce.
- 1 teaspoon garlic powder: Adds depth and warmth to the flavor profile.
- Ranch dressing or blue cheese dressing (for serving): A creamy dipping sauce is the perfect accompaniment.
How to Assemble Buffalo Chicken Tenders

Making Buffalo Chicken Tenders is a fun process that results in a delicious meal. Follow these simple steps, and you’ll be on your way to crispy perfection. Enjoy the aroma as they bake, and don’t forget to have plenty of dipping sauce on hand!
- Preheat your oven to 400°F. This is crucial for achieving that perfect crispy texture. While the oven heats, prepare a large sheet pan by generously greasing it with cooking spray. If you have one, placing an oven-safe cooling rack on top will help the tenders bake evenly, enhancing their crispiness.
- Take each tender and pat it very dry with a paper towel. This step is vital as it helps the batter adhere better. Remove the tendons from each tender; you can simply cut them out with a sharp pairing knife.
- In a large frying pan over medium-high heat, melt 2 tablespoons of butter. Once it’s melted, add the panko breadcrumbs along with salt to taste (I like to add about 1/4 teaspoon). Cook while stirring constantly until the breadcrumbs are lightly and evenly browned. This should take about 3 to 5 minutes. Transfer the toasted breadcrumbs to a wide, shallow dish.
- In a mixing bowl, combine the batter ingredients: the remaining butter, egg, mayo, flour, paprika, and ranch seasoning. Whisk them together until smooth and well combined.
- Take each tender and generously coat it in the batter. You want to ensure they are evenly covered but not too thick. After battering, dip them into the toasted panko breadcrumbs, pressing gently to adhere.
- Arrange the breaded tenders on the greased sheet pan, spaced apart to ensure even cooking. If there are any leftover crumbs, sprinkle them over the top of the chicken. Then, generously spray the tops of the tenders with cooking spray—this helps them crisp up beautifully.
- Place the sheet pan in the center of the preheated oven and bake for about 10 minutes. After this time, carefully flip each tender over to the other side, taking care not to lose the breading. Spray the new tops with cooking spray again.
- Continue baking for another 5 to 10 minutes, or until the chicken reaches an internal temperature of 160°F. Remember, carryover heat will bring it up to 165°F. Once they’re done, take them out and give them a light sprinkle of salt if needed.
- While the chicken bakes, prepare the sauce by melting the remaining butter in a saucepan over medium heat. Once melted, add the remaining hot sauce and whisk until well combined. You can season it further with salt or additional brown sugar if you prefer a sweeter sauce.
- Toss the baked tenders in the sauce while they’re still warm. I like to coat half, enjoy them, and then toss the rest to keep them crispy. Serve them hot with your choice of ranch dressing or blue cheese dressing, and enjoy with celery and carrot sticks on the side!
- For the air fryer method, simply preheat your air fryer to 400°F. Place the breaded tenders in a single layer in the basket (you might need to do this in batches). Cook for 5 to 8 minutes, flip, spray with cooking spray, and cook for another 5 to 8 minutes until golden brown and cooked through.
Things Worth Knowing
- Patting dry: Ensure you pat the chicken tenders dry before coating them. This step is crucial for getting a good batter to adhere.
- Breadcrumb choice: Using panko breadcrumbs instead of regular breadcrumbs is key for achieving that extra crunch!
- Oven temperature: Always preheat your oven to ensure even cooking and crispiness.
- Sauce flavoring: Adjust the amount of hot sauce and brown sugar based on your preference for heat and sweetness.
Recipe Notes about Buffalo Chicken Tenders
These notes will help you get the most out of your Buffalo Chicken Tenders preparation. From storage tips to serving suggestions, let’s dive into how to enhance your experience.
- Storage: The tenders don’t stay crispy when stored, so it’s best to cook only what will be enjoyed the same day.
- Freezing: You can freeze the raw, breaded tenders before baking. Place them in an airtight container, and they’ll be good for up to two months. Bake from frozen when ready!
- Pairing: These tenders pair excellently with fresh celery and carrot sticks, which add crunch and balance to the meal.
- Variety: Feel free to experiment with different sauces. A honey garlic or sriracha lime sauce can offer a fun twist!
- Healthier option: For a lighter version, consider air frying the tenders rather than traditional baking.
- Leftovers: If you happen to have leftovers, reheating in the oven can help restore some of the crispiness.
- Meal prep: Prepare the breaded tenders in advance for quick weeknight dinners!
Serve This Buffalo Chicken Tenders With
When it comes to serving Buffalo Chicken Tenders, the possibilities are as diverse as they are delicious. Here’s how to create the perfect meal around them:
- Crispy coleslaw: This crunchy side dish balances the spicy heat with its creamy texture.
- Sweet potato fries: The sweetness of the fries makes a lovely contrast to the tenders’ bold flavor.
- Veggie platter: Serve with a platter of fresh veggies like carrots, celery, and bell peppers for a refreshing crunch.
- Game day platter: Arrange these tenders on a large tray with various dips for a fantastic game day snack.
- Casual dining: These tenders are perfect for a fun, informal dinner. Set them out with a variety of sauces for guests to choose from.
- Picnic treat: Pack them for a picnic; they’re great served cold too!
FAQ
Conclusion
In summary, Buffalo Chicken Tenders are not just a tasty dish; they embody the joy of cooking and sharing good food with loved ones. Their crispy coating paired with that iconic spicy kick makes them a standout choice for any occasion. I encourage you to try making these tenders tonight; you won’t be disappointed!
Buffalo Chicken Tenders
Ingredients
Equipment
Method
- Preheat oven to 400°F. Generously grease a large sheet pan with cooking spray. If available, add an oven-safe metal cooling rack on top of the sheet pan and generously grease that as well. (This is optional, but ensures more even baking/crispier chicken.) Pat each tender very dry with a paper towel. Remove the tendons (cut them out with a sharp pairing knife).
- Melt 2 tablespoons butter in a large pan over medium-high heat. Once melted, add panko and salt to taste (I add 1/4 teaspoon). Stir constantly until lightly and evenly browned, then transfer to a wide, shallow dish.
- Add all batter ingredients to a bowl and whisk until combined.
- Generously coat chicken tenders in batter and then in breading. Add tenders, spaced apart, to the sheet pan on top of cooling rack. Press any leftover crumbs on top of chicken. Generously spray the tops of the tenders with cooking spray. (We’ll spray the other side later.)
- Place sheet pan in the center of the oven and bake for 10 minutes. Remove and gently flip tenders to the other side (careful to avoid losing breading). Generously spray new tops with cooking spray and bake another 5–10 minutes or until chicken is 160°F on a food thermometer (carryover heat will bring it up to 165°F). Remove from oven and taste. Add a light sprinkle of salt on top if needed.
- While chicken bakes, make sauce by melting butter on the stovetop over medium heat. Once fully melted, add rest of sauce ingredients and whisk to combine until smooth. Season to taste with salt (I add 1/4 teaspoon). If you’d like the sauce to be sweeter, add additional brown sugar. Remove from heat.
- Toss tenders in sauce (I like to coat half, eat, then coat the rest to keep things nice and crispy!) and enjoy dipped in ranch or blue cheese dressing. I love serving celery and carrot sticks on the side as well!
- Air Fryer Instructions: Set air fryer heat to 400°F. Add breaded tenders to the fryer basket in an even layer (you may need to do this in batches; don’t overlap chicken). Cook for 5–8 minutes, flip the tenders, spray with cooking spray on the other side, and cook another 5–8 minutes or until golden brown and cooked to 160°F. (Carryover heat will take them to 165°F.)
Notes
- Tip 1: The tenders don’t stay crispy when stored, so it’s best to cook only what will be enjoyed the same day.
- Tip 2: You can freeze the raw, breaded tenders before baking. Place them in an airtight container, and they’ll be good for up to two months. Bake from frozen when ready!
- Tip 3: These tenders pair excellently with fresh celery and carrot sticks, which add crunch and balance to the meal.
- Tip 4: Feel free to experiment with different sauces. A honey garlic or sriracha lime sauce can offer a fun twist!
- Tip 5: For a lighter version, consider air frying the tenders rather than traditional baking.
- Tip 6: If you happen to have leftovers, reheating in the oven can help restore some of the crispiness.
- Tip 7: Prepare the breaded tenders in advance for quick weeknight dinners!